IP Camera Settings for Difficult Lighting Conditions
Filed under: IP Cameras, ATM Security
If you’re a technician installing IP cameras for a bank or credit union, you know how challenging it can be to capture clear video surveillance images in dynamic lighting conditions.
While some banks have controlled indoor lighting, others have bright sunlight pouring in through floor-to-ceiling windows in ATM vestibules. Other businesses, including quick service restaurants (QSRs), face similar challenges.
To help you get the best video quality possible, I’ve put together some tips on which IP camera settings to use in different lighting scenarios.
It’s important to note that surveillance cameras are shipped with default settings that are not always optimized to give you the best image quality for the scene you are trying to capture.
In some circumstances, you can simply plug in your camera and walk away, but to get the best quality video in complex lighting conditions, a little fine-tuning is highly recommended.
Controlled lighting
Let’s first tackle an environment with controlled indoor lighting and assume you’re using our ME4 IR MicDome camera with high dynamic range (HDR). If the lighting is sufficient and consistent across the field of view (FOV) and there are no shadows in the image, I recommend turning off HDR altogether. If the lighting is insufficient and there are shadows in the image, you’ll want to leave it on. This will help brighten the low light areas and reduce noise appearing as pixilation. Not only does the noise detract from the image quality, it also increases your data rates and takes up more storage.
You can also adjust the Gain setting on your camera, which boosts the light intensity being captured. If your environment’s lighting is bright and relatively even, you can try turning the Gain setting off altogether, which can reduce the amount of visible noise in the image. Conversely, if there isn’t enough consistency, you can turn the Gain up to 1, 2 or 3. Remember that at night, when the lights are off, you should check how Gain impacts night mode. The ME4 IR MicDome automatically goes into night mode with its smart IR technology providing its own light source.
Bright sunlight and shade
Now, let’s have a look at the adjustments you would make when you have bright sunlight as well as shaded areas in the same scene, which is typical in an ATM vestibule or a QSR dining area. If there is a small to medium amount of sunlight, the HDR Normal setting will suffice to illuminate the scene without overexposing the brightly lit parts of the FOV or underexposing the shaded areas. If, on the other hand, you have a full-size, two-story window bathing the scene in direct sunlight, you will most likely need to select the HDR Strong setting. The image won’t be as sharp, but you’ll be able to clearly identify an ATM user or fraudster who might otherwise be underexposed and difficult to recognize.
You can also schedule a combination of settings, including HDR, by time of day. For example, you may want to set HDR to Strong during the day, but turn it off completely at night.
To further optimize image quality at night, you can adjust the camera’s exposure and slow down the shutter speed, allowing in more light. Fast moving objects in the FOV — cars, for example — will appear blurry, but if you’re interested in capturing clear bright images in the dark, slowing the shutter is likely your best option.
This training video will give you a more detailed explanation of how you can use exposure adjustments to optimize image quality at night.
You can make all of these changes using your March Networks client software, where you can see real-time camera views and get instant feedback on the modifications you make.
Compression
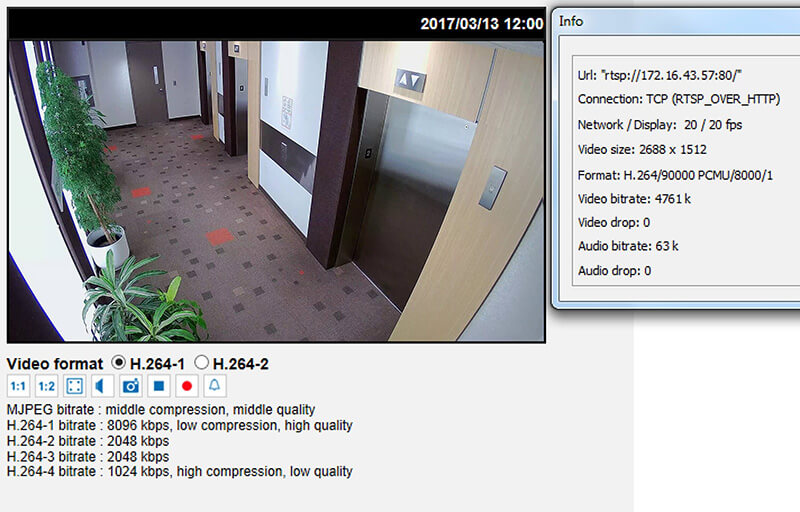
Once you’ve optimized the camera for your specific environment, you can now make a decision on what level of compression to apply. The March Networks ME4 cameras are, by default, set to a variable bit rate capped at 4 Mbps. You can instantly improve the overall image quality by setting the maximum bit rate to 6 or 8 Mbps. It’s important to note that the bit rate is variable and the camera will only use the allocated bandwidth as needed. As seen in the image included below, the compression level is set to 8 Mbps (or 8096 kbps) but the camera’s video bitrate (seen to the right) is only 4.7 Mbps, so don’t be afraid to increase the compression value as it will have a great benefit on the overall quality of the image.

Increasing the compression value can improve overall image quality.
I hope this blog helps you set your IP cameras for optimum performance in difficult lighting conditions. If you have further questions, please post them below.