Simplify System Upgrades with Our Mark for Replacement Feature
Filed under: Hybrid NVRs
One of the consequences of manufacturing the industry’s most reliable network video recorders (NVRs) is having a lot of customers with previous generation March Networks NVRs. Even though they were manufactured over a decade ago, many of our 4000 Series recorders are still in use and functioning well.
When customers do decide to upgrade to our high-performance 8000 Series Hybrid NVRs, they often reach out to us for guidance. After all, replacing and reconfiguring hundreds of recorders can be a time-consuming task.
In an effort to help, we created a Mark for Replacement feature that lets our certified partners quickly replace an NVR and automatically configure it to the same settings as the previously installed recorder. With this feature, firmware, alarms, schedules, analog camera names, and retention rules are automatically downloaded to the new NVR with just a few clicks of the mouse. This dramatically speeds system upgrades and minimizes downtime, particularly for enterprise-level customers.
Replace your NVR in a few simple steps
If you’re a March Networks certified partner that wants to take advantage of the Mark for Replacement feature, just follow these steps outlined below. Make sure the recorder you are removing is running our Visual Intelligence software version 5.7.10 or higher and that your customer’s Command Enterprise Server (CES) software is version 1.10 or higher. You’ll also need to ensure video channels remain consistent, so if you’re replacing a 16-channel NVR, the new recorder must also be a 16-channel model or higher.
To get started, power down the existing recorder and disconnect it from the network. This is important because an NVR that’s connected to CES can’t be marked for replacement.
The recorder’s configuration details will already be saved on your central server, so just do the following to set up your new NVR:
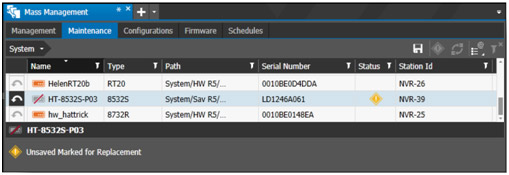
- Go to Tools in the CES workspace and choose Mass Management. In the Maintenance subtab, select the offline recorder you want to replace and click the diamond-shaped Mark Device for Replacement icon on the right-hand side of the toolbar.

The Unsaved Mark for Replacement status symbol appears in the Status column. Click Save. The Status changes to Marked for Replacement.

- When you are ready, physically install the new recorder, put it on the network and register it to the server.
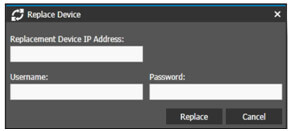
- In the CES workspace, click the Replace Device icon immediately to the right of the Mark for Replacement icon in the toolbar, top right. This opens the Replace Device dialog box.

- Enter the IP address, the username and password (admin/admin) of the new recorder, and click Replace.
The status of the recorder will change to Pending as the replacement process begins. Information about the progress of the replacement appears beneath the list. Successful completion of the process is indicated in the Status column. If the replacement isn’t successful, the reason for the failure will be indicated, allowing you to address the problem and retry.
If the replacement was successful, a few details, including IP camera names, will have to be manually reconfigured, but the majority of the work will have been completed for you.
The Mark for Replacement feature was originally developed to simplify the replacement process for recorders that were returned for repair, because the repaired unit would not have the same serial number, MAC address or software release of the unit being returned. With some small changes to the feature, March Networks was able to extend the functionality to allow the replacing of old with new, so you can very quickly upgrade your customers to our powerful 8000 Series Hybrid NVRs.
Remember, if you ever have an issue with a March Networks recorder that’s still under warranty, we’ll send you an advance replacement unit for free!
Got a question or comment? Give us your feedback below.